Harp Guitar Making

Home | Courses of Study
Tutorials | Guitarmaking Tips | Web Sites

Build Better Router Jigs


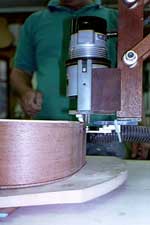
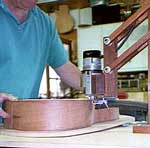
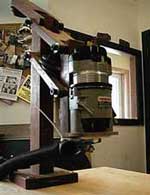
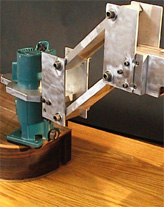
If you have gone through the pictures of the Basic Steel String Construction Class, you may have noticed the overhead router jig Louise Harrison is using to route the binding ledges on her guitar body. As any of you who might have made a guitar will know, getting those ledges even is very difficult if you are using a regular router or hand-held purfling groove cutter. The Nickerson overhead router solves that problem and makes what used to be a tedious task simple.

After doing a lot of research and even ordering a kit and plans for such a device from one of the luthiers supply companies (which he returned as being unsuitable), Brad came up with this simple and inexpensive fixture for holding a veneer trimmer to do the job. The photographs here will give you enough information to make one of these fixtures but if you would like a set of plans, we can send them to you for $30 plus $1 for postage and handling.


Mail your check to:
Leeds Guitarmakers
8 Easthampton Road
Northampton, MA 01060

And Another Router Fixture


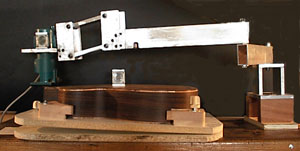
Here is another router fixture for you. I came across it in the Fall 2002 (No. 71) issue of American Lutherie. What caught my eye was a picture of Harry Fleischman, blindfolded, routing the binding ledges of a guitar body.


“That’s for me,” I said as I looked at the article with yet a stronger pair of reading glasses.


This device is somewhat more complex than the Nickerson fixture described above. It requires a carriage for the guitar to keep the surface being routed level for one thing, and because the router moves over a stationary guitar body, the horizontal depth is controlled by a concentric bearing attached to the cutter itself rather than the adjustable horizontal depth adjustment on the Nickerson jig.

This means you have to get cutters with bearings to make standard cuts for bindings and perflings. I use a 1-inch cutter with bearings to cut for my standard bindings and perflings. I use ½-inch bearings with sleaves machined and press fit to the bearings to make the required cuts. The vertical adjustment is made using the router’s adjustable base. I just change the bearing to adjust the horizontal depth of cut.


The advantage of this device is that one moves the tool rather than the work. While moving the body around to make ledge cuts with the Nickerson device works well, it does require a fair amount of practice to get it right. The Fleischman device has an omnidirectional cutting plane, therefore one only needs to run the router around the body and voila! The job is done.


I built my fixture out of T-2 aircraft aluminum. In the article in American Lutherie, Harry describes one made of wood. Either will do. Be sure to use thrust bearings at all pivoting points both on the arms controling horizontal movement and the pivots controling vertical movement. These bearings are best obtained from either Granger Industrial Suppliers or MSC Industrial supply. Get oil empregnated bronze bearings.


I have two small levels which I use to set

up the router and the guitar body. Using

them assures that the cutter is making a perpendicular cut.


Gobar Deck Tips


I first saw a go bar deck about 15 years ago and was an instant convert. The idea of using nice, light, and above all, inexpensive, easily replaceable strips of cedar to clamp back and top braces and assembling bodies was an epiphany. It turned out the idea of using sprung strips of wood (the go bars) to clamp bars to plates (braces to tops) was at least two centuries old. After doing some research, I found a picture of a Viennese harpsichord shop where the workers were using sticks sprung between the ceiling and floor level of the shop to clamp braces onto harpsichord soundboards. Not wanting to take up quite so much room in my shop and not wanting to swing around eight-foot sticks where they might hit a shopmate or knockover an instrument, I decided to combine the deck with bench space and use bars about 42 inches in length.

Space is always at a premium in a shop, especially for many of our students who are using some nook in his or her house or apartment for a shop. The other consideration is cost when setting up a shop and sticks are much cheaper than clamps. They are also faster to use, allowing for gluing up entire bracing systems in one operation (see picture). The great advantage of the deck is it can also be used for a bench when you're not bracing tops and backs, or even during that process if you make it big enough. You can add drawers under the bench for tool storage and the top of the deck is a great shelf for storage of wood and parts. Because strength is very important (the combined pressure of the go bars when gluing the braces to a top and back is probably around half-a-ton) there will be no temptation to "make due" with a shaky bench. The trick is to double the plywood on the base and top surface of the deck (3/4" plywood, AC). Brace both decks with 2x4 on 12" centers, notched into the length-wise frame members, which are made of 2x4s screwed together to make 4x4s. Make notches at the ends of the cross-wise members and notch the inner 2x4 on 12" centers.

Put a single layer of plywood on the top of the upper deck and on the bottom of the lower deck The legs and posts are also made of doubled 2x4s notched into the upper and lower deck frames. The deck here at the school is 24" wide, which is the most economical use of ply wood. If you are making a deck which will also be a bench, it might be a good idea to make the lower deck 36" wide and the upper 24" wide. That way you can be using the back of the deck to clamp braces while still having room to work at the front of the bench. Assemble the frame with 3" course thread dry wall screws, the plywood single thickness with 1 1/2' course thread dry wall screws and the double layers with 2 1/2" course thread dry wall screws. Attach the length-wise 2x4s of the upper and lower decks to the wall with 3 1/2" course thread dry wall screws. The go bars are made of western red or yellow cedar, quarter sawn 1/4" x 3/4" x 42". You can find the cedar at almost any lumber yard' it's used for decking. We will supply drawings and parts lists for the go deck for $11 (including shipping and handling).

The Secret Tool for Nut and Bridge Layout


When I first took a look at Bill Cumpiano and John Natelson's Guitarmaking - Tradition and Technology, I said to Bill, "I see you showed the secret tool." With out missing a beat, he said, "Yes, but I didn't name it."

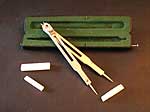
The tool I was referring to was the proportional divider which is pictured in the section of the book dealing with string layout. For years I watched people rely on measurement of string spacing using rulers, while I used a tool my father used for scaling up and down drawings (he was a sculptor and jeweler). The tool is a double-ended divider with a sliding pivot point and a scale of ratios.

Setting the slide to 5 and measuring the distance between the centers of the first and sixth strings, I would get the spacing required to lay out a six-string guitar both at the nut and saddle. The trick is to remember that dividing a space into five equal spaces requires six lines (i.e. the string placements).

I have turned up these devices at flea markets. Draftsmen are abandoning paper and drafting tools to use CAD programs on their computers. However since many artists are still using, dare we call them, brick and mortar tools requiring some manual skill, proportional dividers are still available through good art supply stores and catalogues. I warn you there may be some sticker shock involved, they are expensive.

This is the perfect tool for the mathematically challenged.

Make your own glue pot

Every so often it makes sense to use hide glue for building and repairing guitars. Because it is rarely used, it makes little sense to have to buy a $100 gluepot when
you can make one for yourself for about $25 if you buy the parts from a hardware store, or about $3.75 if you find them at a tag sale.

The parts are as follows:

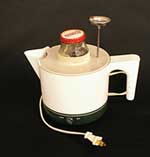
1 Rival electric tea pot ($.50 to $1.50 at a tag sale)

1 dial candy thermometer ($.75 to $2.50 at a tag sale)

1 eight-ounce mayonnaise jar, Helman's, Cain. (free)

Cut out the center of the raised portion of the lid of the teapot. Fit the mayonnaise jar into the hole. Epoxy in place with engine block epoxy, available at auto supply stores. Drill a hole in the lid to accommodate the thermometer. Insert the thermometer into the lid so that it does not touch the bottom of the pot.

Keeping the water bath at about 160 degrees F. will keep your glue at just the right temperature.

A good source for very high quality hide glue is International Violin at 800-542-3538.

Download an MS Excel spread sheet for guitar calculations

All The Critical Calculations For Building a Guitar:

Developed by Elaine Hartstien, this MS Excel spread sheet is the most comprehensive calculator
for all the critical measurements needed for designing and building a guitar. Scale lengths,
compensation, fingerboard tapers, soundhole sizing are only some of the measurements you can
get from this program. Just download it and open it in MS Excel and start exploring the fantastic
amount of information available in it.

If you'd like a copy of the spread sheet email us and we'll send it to you.
Put guitas.xls request in the subject.


Do String Instruments Get Better as They Get Older?

When Violinists Play, Their Violins Improve

Researcher in England say that laboratory tests conducted on wood commonly used to make violins support age-old claims by musicians that the regular playing of a stringed instrument improves its tone.

By Warren E. Leary (Excerpted from the New York Times)

Dr. David G. Hunt of the School of Engineering Systems and Design at South Bank University in London sways his studies with pieces of spruce show that continuous forced vibrations similar to those experienced with regular use of a musical instrument changes the nature of the wood.

In a letter published in the current issue of the journal Nature, Dr. Hunt and a graduate student, Emmanuel Balsan, said that wood vibrated in condition of high humidity increased in stiffness and saw a decrease in dampening coefficient, a measure of cycles of vibrations emanating from the material. Both factors are know to help provide more pleasant tones in spruce, mature pine and other woods used in instrument sounding boards, experts say.

Dr. Hunt, who studies the structure of wood for the construction industry, said the results concerning musical instruments were a byproduct of research in the effect of moisture in wood. A music lover and avid concertgoer, he said he built a guitar several years ago but was not a violin expert.

"People don't understand entirely the structure of wood, even after using it and studying it for centuries," he said in a telephone interview, "Part of the strength of wood is based on the amount of water in it and the way it bonds."

The researchers vibrated beams of spruce at 10 cycles per second for 48 hours and the damping coefficient went down by 5 percent. The changes persisted when the vibrations stopped, they said. Lower damping coefficients mean that a single note is heard longer, which is considered a beneficial attribute.

When the wood was vibrated in a chamber where the humidity was taken up to 80 to 90 percent, the damping coefficient went up fast before drifting downward, they reported. This resulted in a decrease in damping and increase in stiffness during vibrations that persisted when the vibrations were turned off, they said.

Dr. Hunt attributed the changes in the wood to a redistribution of moisture in the wood caused by the vibration that remained stable for several days after the test. Over time perhaps months, he speculated, the wood was expected to go back to its initial state of equilibrium unless the vibrations were applied periodically.

"Musicians have said that the sound of an instrument gets better the more you play it, and we have found a basis for that," he said.

"Although for the best care of a musical instrument, both high and low humidities should be avoided," the researchers wrote, "the results suggest that at intermediate or high humidities, the sound quality may be improved by regular playing."

Carleen Maley Hutchins of Montclair, NJ, considered one of the world's best violin makers and researchers, said she found the British work interesting and consistent with much of her research. Among other things, she has vibrated violins for 1,600 hours using frequencies from radio broadcasts and found that this changes wood resonance.

"This would appear to complement work I have been doing," Mrs. Hutchins said in a telephone interview, "but I would question their conclusion that moisture bonding is the reason. There is research to indicate that the molecular bonds of wood actually break because of vibration and that this what affects the tonal qualities. So I think there may be more to it than moisture bonding."

Return to top

Leeds Guitarmakers
Click here to send an inquiry or comments to Leeds Guitarbuilders' School
12 North Main Street - PO Box 434 - Williamsburg, MA 01096
(413) 582-0034


Home | Courses of Study
Tutorials | Guitarmaking Tips | Web Sites